Wednesday, January 25, 2017

Log XXXVIII - Artemis Catch

After so many posts on the maintenance of the boat, let us talk about more serious stuff this time - fishing!

We always tried to slot in some fishing time whenever we go for sea trials and we found out that Tusk fish is very common in Singapore waters.


And once a while we would catch Deep Sea Barramundi.


This species of barramundi does not grow big.


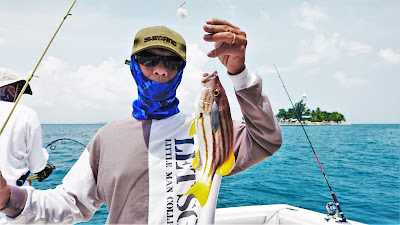
Spanish Flag Snapper is quite common too.


Sometimes we would catch assorted fish types like this Sickle Fish.


But what Artemis has most luck with is... Coral Trout!


Other than the never-ending maintenance, this is the other enjoyable part of having a fishing yacht. Wish you a Happy Chinese New Year and as the Chinese saying goes, "Every year has abundance of fish!" (年年有余)

Wednesday, January 18, 2017

Log XXXVII - Artemis 1 (Leaks and More Leaks)

Putting the engine back in one piece is one thing. But to make sure that it had been assembled properly is another. After the operation of changing the pistons/cylinders and broken valve, there were all sorts of leaks in many areas...

1) Coolant leaks
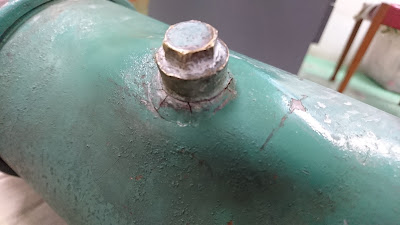
The coolant was leaking from the heat exchanger plug.

Notice the cracks around the plug.

So it was not just simply changing of the plug. I had to take the whole heat exchanger out for brazing.

The welding looked very ugly, like some kind of disease. So I gave it a new coat.

Now it looks like new. After I installed the heat exchanger back through this limited access space, the coolant started to leak from another spot.

The expansion tank hose started to leak.

There was a crack at the joint between the big hose and the small hose.

And there was also a crack at the hose connection part.

After I replaced the hose. Another part started to leak!!!
This time it took me much longer time to find out where the leak was. I had to remove the compressor and run the engine to find out this leak location.

The leak was from the cylinder head gasket! It was this particular rusty coolant hole that leaked. You have to be very observant to notice the slight dent in the gasket which caused the leak.

So we had to dismantle everything again... to change the head gasket (the LONG list of parts to be removed in order to access the gasket is in my previous post "Engine 101"). And this time, we sprayed copper gasket spray on the new gasket before covering it back.

After finally resolving all the coolant leaks, other types of leaks started to appear.

2) Engine Oil leak
Engine oil was leaking from the pipe leading to the turbocharger.
The rectification for this was relative easy - simply by replacing the gaskets.

3) Diesel leak
This is not that significant but I try to make my engines as leak free as possible. There were various leaks from the diesel delivery pipes and connections.

And sometimes tightening it was just not enough. We have to bend the pipes so that that connections can fit perfectly or under worse case scenario, introduce additional copper washer.

External diesel leak was not as critical compared to internal leaks because if there is an internal diesel leak, the diesel will mix with the engine oil, making the engine oil less viscous. So if you have your engine oil pressure meter readings that look something like this (one high and one low), and you have increasing engine oil reading from the dip stick, the cause might be a diesel leak.

There are a few locations that diesel can find their way to mix with engine oil. For my case, the leak was from the fuel injection pump into the engine body. It is not easy to repair injection pumps, so I took it to an injection pump specialist to replace the seal and bushing.

One important thing to take note during installing the fuel injection pump. There is a timing gear for the pump, hence there is only one orientation that the pump can be installed back.

The four nuts seemed so easy to install but in fact they were not! The spacing between all four nuts varies slightly. That means you can only turn the injection pump in a specific configuration so that all four holes can match.

4) Steering Fluid leak
The cylinder seals for the hydraulic steering was damaged. Hydraulic oil was seen flowing out from the end of the piston.

So I had to remove the whole cylinder, dismantled it and replaced the seals. This is considered an easy job compared to dismantling the engine.

5) Seawater leak
The plug at the oil cooler was badly corroded and sea water started to gush out.

Notice that the mechanic just used some common tap plug to plug the oil cooler hole. It is just a matter of time before it fails. So I replaced the plug with a stainless steel one.

Basically whatever fluid that flows in the boat, it leaked. Since it was a hassle to always have to wait for the mechanic to come from Malaysia, I did all these together with the help from my father - a process which involved lots of sweat and blood.


Thursday, January 12, 2017

Log XXXVI - Artemis 1 (Engine 101)

As I was about to really start enjoying fishing on the boat, something went wrong with the starboard engine during one of the first few trips.

The engine oil cap was forced out of place and engine oil gushed out.

The whole engine was covered with engine oil.

Clearing this mess was a small matter. A bottle of degreaser would do the trick.

It was the underlying problem that caused this to happen which I was worrying about. After checks done by the Malaysian mechanic, we found out that one of the valve springs and the valve was broken.

This is the broken exhaust valve.

Just some basic knowledge on how a 4-stroke diesel engine work. There are exhaust valves (in charge of discharging exhaust gas) and intake valves (in charge of letting air into the combustion chamber). Below the valves is the piston.


So if the valve broke, it will drop onto the piston. The piston moves up and down the cylinder to compress the air in the combustion chamber against the cylinder head to turn the propeller. In order to access the broken valve, we had to remove the cylinder head which equaled to 'BIG headache'!

Let me try to list out what items we have to remove before we can take out the cylinder head.
1) Air filter
2) Coolant expansion tank
3) Compressor
4) Turbocharger
5) Heat exchanger
6) Intercooler
7) Thermostat
8) Exhaust manifold
9) Numerous oil/fuel/water/air pipes

It took one day to dismantle these items.

 This is where the broken exhaust valve and spring should be.

At last we reached the cylinder head gasket, where we could access the broken valve.

Inspecting the cylinder head for any damage that might be caused by the piston crushing the broken valve onto the head.

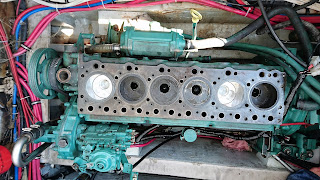
The engine looked much smaller when so many parts were taken off.

Luckily there were no damage to the cylinder head. I also made used of this opportunity to check whether any of the pistons and cylinders were damaged. In my previous post on sea trials, there were many cases of engine overheating and one of the overheating incident actually jammed the engine. In case you are wondering how overheating will jam the engine, let me explain briefly here.

Heat will cause metals to expand. When an engine overheat, the piston will expand more than the cylinder surrounding it. When the expansion is more than the clearance between the piston and the cylinder, the piston will be stuck in the cylinder causing the engine to stop instantly. As this happens while the engine is running, it will usually result in damage to the piston and the cylinder lining walls.

This is what will happen to the piston when it jammed in the cylinder.

There were very deep scratches on the piston as well as on the cylinder lining. The piston rings were also stuck tight. When this happens, there will be loss in compression resulting in lost of power, and engine oil will get into the combustion chamber resulting in excessive white smoke.

I'm not sure whether the consequences of overheating will cause the valve to break over time but coincidentally the valve which was broken was the valve for the damaged piston and cylinder too.

There was another piston with a rough top surface. So I decided to change this one too.

This is the new exhaust piston/cylinder and the exhaust valve.

It is obvious from the photo above which two pistons and cylinders were replaced.

It took 2 days to assemble the engine. This operation was made much tougher as we were working in very confined space. Sometimes tightening just a single nut may take 15 minutes instead of the usual 1 minute or less.

Another con of working on the engine while on the boat is that you will definitely dirty the boat with your greasy hands and feet. It was an extremely time consuming task to clean the white boat and some of the stains had already become permanent.

Monday, January 9, 2017

Log XXXV - Artemis 1 (Back Home)

After 4 months at the Malaysia yard, Artemis finally came home with the 'new heart transplant'. It didn't just end here, there were still a to-do-list to carry out e.g. brighten up the deck.


1) The control panels at the helm were all cracked. So I replaced them with new ones.

Cracked panels

New panels

with more interesting switches...


2) The circuit breaker was also in a bad condition.

So I replaced it too and added in more accessories which my boat was seriously lacking - spotlights.

And by the way, changing the circuit breaker board is really a time consuming process. Just take a look at the wires...

3) Spotlights are very important especially when travelling at night. They are not for us to look at where we are going because you can never see clearly what's in front on a moonless night. The lights are for other ships to spot your existence so that the tankers will not run over your boat.

They are many types of spotlights in the market, and the price range is very big. It can range from $40 a piece to $200 each with the same lumens. I chose the cheaper ones at $60 per pc type and sort of regretting it now.


Here are a few things to note when choosing spot lights:

- Use LED spotlights rather than filament though the price is much higher. Power supply is a luxury when you are out at sea. Use it conservatively. Invest in spotlights that require lower power and yet provides sufficient brightness for your needs - LED.


- Lights attract fish and squids. Choose wisely whether you want warm or white light. White light offers greater visibility and warm light seems to attract squids more effectively. And by the way live squids are the best bait you can get.


- There is a buzzing sound when I switch on more than 4 spotlights at one time. I believe it might be because of low voltage but the lights should not be even buzzing at low voltage at all. They should either dimmed or not light up, but they choose to buzz in that irritating frequency! I thought buzzing only exists with lights using AC but mine, which is running on DC, also buzzed - problem unsolved.

Planning to try: Change the circuit breaker to higher current rating because it trips once a while when I switch on too many spotlights. This might be the cause of the annoying buzz.

- The mounting brackets are not stainless steel! These spotlights are meant to be used in marine environment and I thought stainless steel A316 is a default. The brackets rusted in less than a year.


No future plans in mind to rectify this. It took me and my friend 12 hours to install only 8 spotlights! I need to rest a while before touching those spotlights again.

And lastly,
4) The fuel intake for the port engine had not been smooth. There were theories such as the fuel pump is not strong, the fuel vent in the fuel tank cracked or blocked, hairline cracks in the fuel pipes causing fuel leak, etc. But finally I found the problem hiding in one corner - the fuel valve.


The fuel intake valve is a one way valve that only allows fuel to flow to the engine and not back to the fuel tank.

This is to ensure that there will not be any back flow of fuel into the tank and create air pockets in the pipe. The air pockets might create an air lock and the engine will not be able to start. The problem with this valve was that some debris got into the valve and prevent it from opening. I managed to flush out the debris and now fuel is flowing very smoothly.

Yeah! I can finally enjoy fishing on my boat now!

Oops! I said that too early, way too early....