I believe this will happen to all boaters at least once in their lifetime, it's just a matter of sooner or later when you get that bump onto your hull or props. During one of the exploration trips to the Southern Islands, which are notorious for their hidden shallow waters, we were cruising around Pulau Hantu when I felt the hull or props hit onto something. The first instinct was to look over to the side of the boat, and I could see sand and sea weeds being stirred up by the propellers.
The sounder was registering 4 meters depth and before I knew it, the depth shot up to 1 meter and followed shortly by the impact. Luckily I was travelling at a very slow speed of 5 knots when this happened, so hopefully even if there was damage it would not be serious. The boat behaved normally as I drove back to the marina. After securing the boat, I dived down to check on the hull, propellers and rudders.
Both the props and rudders still looked in one piece and no damage on the hull was observed. After this incident, I think a diving mask is one of the necessities to have on board in case of any emergency inspection or work needs to be carried out underwater.
Since I was planning to paint a new layer of gel coat on the boat, it would be a good opportunity for me to inspect the hull when I lifted the boat up for polishing.
The shaft anodes still looked fine but it would be difficult for me to change next time, so they were replaced.
The trim tab anodes were in the worst condition which later I realised it might be due to the trim tabs not electrically bonded. I shall cover this in my later posts on the boat bonding and earthing system.
Since I was planning to paint a new layer of gel coat on the boat, it would be a good opportunity for me to inspect the hull when I lifted the boat up for polishing.
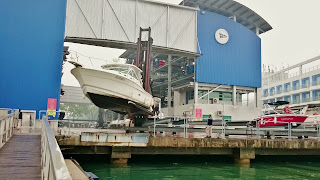
As the weight of my boat falls marginally below the capacity of the fork lift in the marina, we decided to bring her up during high tide to lessen the lifting height. So remember to check whether your marina facilities can handle your boat before purchase, or you will have to budget in additional costs for maintenance at another yard whenever you need an up slip.
After my first back breaking experience of polishing the boat's body, I decided to let someone else do the hard work for me this time, at a much higher cost of course. However I was not able to laze around either. I had to touch up on the anti-fouling paint on the props, rudders and localised spots on the hull.
You can see the contrast between the port prop and the starboard prop in this photo showing the before and after application of anti-fouling paint.
I also changed the anodes on the shaft, trim tabs and hull.
The trim tab anodes were in the worst condition which later I realised it might be due to the trim tabs not electrically bonded. I shall cover this in my later posts on the boat bonding and earthing system.
I was not able to find the exact hull anode available in Singapore and had to order a customized one to fit the screws. So I didn't change it since the condition still looked acceptable to me.
This whole operation took 3 days to complete.
First day - up slip.
Second day - hard labour.
Third day - boat back in water again.
After the 3 days, the boat had a new polished look and luckily the bumping incident didn't cause any damage.


No comments:
Post a Comment