This post is all about loops and circles. If you like things to look neat and tidy, here is one way you can organise your mooring ropes.
As you can see, I use a total of 6 ropes to moor Artemis at the marina. It might look overkill but if your boat can experience strong winds and waves in the berth, this is definitely necessary. I used to be stingy in the ropes by using a bare minimum number of three mooring ropes. And within 1 month, one of the ropes broke. Luckily someone saw the broken rope and helped me to tie the good end of it to secure back my boat. I still don't know who this kind soul is, but if not for this person, my boat might pin ball around in the marina.
On top of doubling the number of mooring ropes, I also upgraded the ropes to those black ones with build-in elastic bands. This elastic band helps to absorb the impact from the waves thus lengthening the lifespan of the rope and also gives more protection to the boat body. And of course this kind of rope is much more expensive than the normal white ones too.
My port side engine was very unstable. It would just shut off without any reason randomly. I suspect there might be problems with the fuel intake. So I checked the fuel tank outlet and found this bunch of 'circles' inside.
I do not know what are those, and how they got into my fuel tank. But hopefully the engine would be stable after removing this. Because if one of my engines suddenly breaks down while berthing, it can be quite a disaster. Just like what happened to my hand rail.
The boat spin out of control when one engine died suddenly and the hand rail got caught in between the pulpit and anchor of another boat, causing the base connection bolt of the rail to break off. I had to replace the connection with base fittings instead. But the rail base fittings come in standard angles and my deck is sloping, which makes the angle between the sloping deck and the hand rail an unique angle. So I had to cut a few rubber gaskets to fill up the gap after trying a few types of base fittings in vain.
Well the consequences could be much worst than a broken hand rail. Artemis was lucky to escape without any 'scaring' both to herself and to others.
Saturday, May 28, 2016
Friday, May 27, 2016
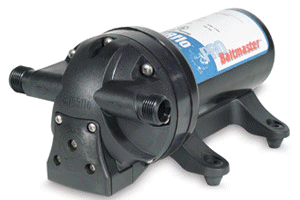
Log XXIII - Artemis 1 (Pumps and more Pumps)
Can you give a guess how many pumps are there on Artemis 1?
Here goes the list:
Bilge pumps
1) Front
2) Mid
3) Aft
4) High water
Sanitation pumps
5) Pressure
6) Macerator
Water pumps
7) Water supply
8) Raw water
9) Bait well
There are a total of 9 pumps to maintain on board Artemis 1! Hopefully I didn't miss out any. These are not including those fuel and water pumps in the engines and generator.
Though the pumps are not critical in the operation of the boat but they are definitely necessary for your safety, and will give you lots of inconvenience if they break down during your trip. So take good care of them and check on them regularly.
Though the pumps are not critical in the operation of the boat but they are definitely necessary for your safety, and will give you lots of inconvenience if they break down during your trip. So take good care of them and check on them regularly.
Sunday, May 1, 2016
Log XXII - Artemis 1 (Hull Inspection)
I believe this will happen to all boaters at least once in their lifetime, it's just a matter of sooner or later when you get that bump onto your hull or props. During one of the exploration trips to the Southern Islands, which are notorious for their hidden shallow waters, we were cruising around Pulau Hantu when I felt the hull or props hit onto something. The first instinct was to look over to the side of the boat, and I could see sand and sea weeds being stirred up by the propellers.
The sounder was registering 4 meters depth and before I knew it, the depth shot up to 1 meter and followed shortly by the impact. Luckily I was travelling at a very slow speed of 5 knots when this happened, so hopefully even if there was damage it would not be serious. The boat behaved normally as I drove back to the marina. After securing the boat, I dived down to check on the hull, propellers and rudders.
Both the props and rudders still looked in one piece and no damage on the hull was observed. After this incident, I think a diving mask is one of the necessities to have on board in case of any emergency inspection or work needs to be carried out underwater.
Since I was planning to paint a new layer of gel coat on the boat, it would be a good opportunity for me to inspect the hull when I lifted the boat up for polishing.
The shaft anodes still looked fine but it would be difficult for me to change next time, so they were replaced.
The trim tab anodes were in the worst condition which later I realised it might be due to the trim tabs not electrically bonded. I shall cover this in my later posts on the boat bonding and earthing system.
Since I was planning to paint a new layer of gel coat on the boat, it would be a good opportunity for me to inspect the hull when I lifted the boat up for polishing.
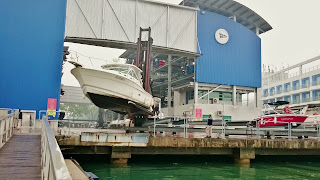
As the weight of my boat falls marginally below the capacity of the fork lift in the marina, we decided to bring her up during high tide to lessen the lifting height. So remember to check whether your marina facilities can handle your boat before purchase, or you will have to budget in additional costs for maintenance at another yard whenever you need an up slip.
After my first back breaking experience of polishing the boat's body, I decided to let someone else do the hard work for me this time, at a much higher cost of course. However I was not able to laze around either. I had to touch up on the anti-fouling paint on the props, rudders and localised spots on the hull.
You can see the contrast between the port prop and the starboard prop in this photo showing the before and after application of anti-fouling paint.
I also changed the anodes on the shaft, trim tabs and hull.
The trim tab anodes were in the worst condition which later I realised it might be due to the trim tabs not electrically bonded. I shall cover this in my later posts on the boat bonding and earthing system.
I was not able to find the exact hull anode available in Singapore and had to order a customized one to fit the screws. So I didn't change it since the condition still looked acceptable to me.
This whole operation took 3 days to complete.
First day - up slip.
Second day - hard labour.
Third day - boat back in water again.
After the 3 days, the boat had a new polished look and luckily the bumping incident didn't cause any damage.
Subscribe to:
Comments (Atom)


